In this series of articles, I’ll cover the various simple yet essential repairs you can do yourself to reduce loss of production, cost of production, and utilities and help keep your employees happy.
While on service calls, I observe presses with head valves leaking steam in almost every plant I visit. This type of leak annoys the presser and significantly increases the time required to produce a quality garment. By following the instructions in this bulletin, you’ll discover how easy stopping this type of steam leak can be.
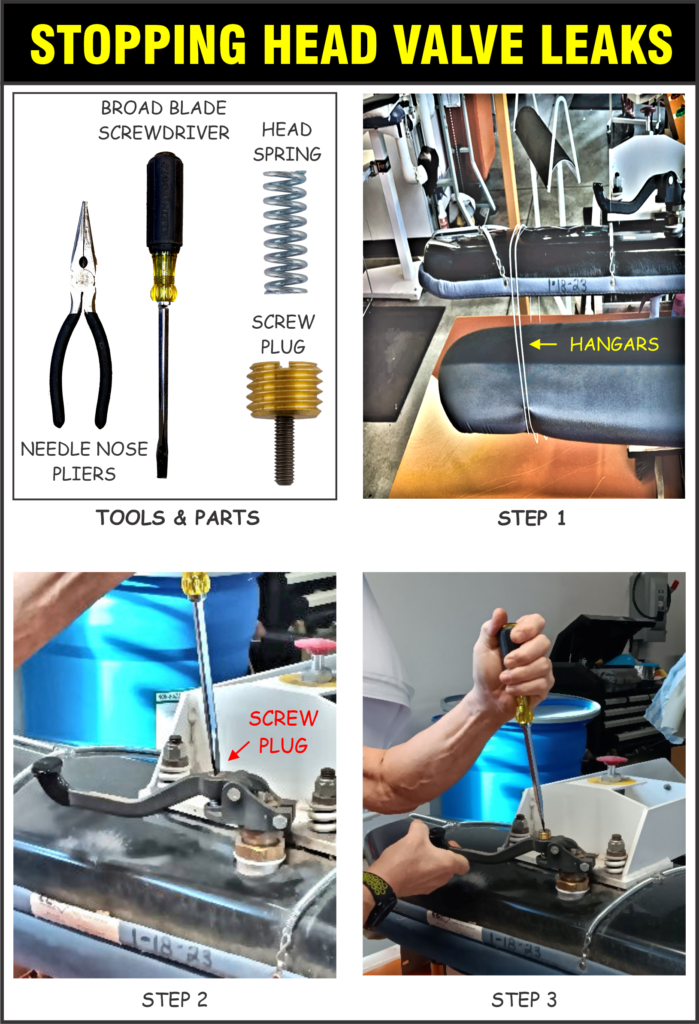
It’s a good idea to have the parts and tools pictured above handy before beginning the procedure (see TOOLS AND PARTS in the illustration). With the head closed, slide a couple of hangars over the end of the head, then open it. Hangars will retain the position of the head to facilitate the repair (see STEP 1 in the illustration).
Before performing further repairs, using a large-bladed screwdriver, to stop the leak try screwing the screw plug into the valve handle (see STEP 2 in the illustration-NOTE-ON SOME VALVE HANDLES, THERE IS AN ALLEN SCREW RETAINING THE PLUG THAT NEEDS TO BE LOOSENED FIRST).

If the valve leaks steam, shut off the steam and return valves, then close and lock the head. Then, press down the head steam valve while simultaneously stepping on the buck steam and vacuum valve pedals to bleed off any remaining steam pressure.
Unscrew the plug from the valve handle and remove the spring from the head valve. A needle-nosed pliers is helpful for this task.
If the spring is broken, it’s usually a slam dunk that was the problem; if not, it could be a bad valve disk. Whether the spring is broken or not, if you have a spare, replace the spring.
Drop the new spring into the valve handle and get the lower end centered in the screw hole. Lift the valve handle up all the way, and using the large-bladed screwdriver, forcefully push the screw plug down into the threaded hole while rotating clockwise. You may need someone to hold the handle up for you as you push down on the screw plug. (see step 3 in the illustration- IF THERE WAS RETAINING ALLEN SET SCREW PRESENT, TIGHTEN IT DOWN).
After screwing the plug into the handle until it stops, back the screw back out ¾ of a turn and open the steam and return valves and wait about 5 minutes for the press to heat up again. You should be good to go. If the valve still leaks, the valve disk is likely at fault and must be replaced, which will be a topic for a future article.
Well, that’s it for this month. Look for a downloadable PDF file of this article on my FIXIT-ACADEMY website www.fixit-academy.net , where even an amateur can learn to make their own equipment repairs.

Bruce Grossman
Bruce Grossman is the Chief of R&D for EZtimers Manufacturing. EZtimers is the manufacturer of the new EZ DOSE boiler compound manager and return tank level control which replaces that troublesome ball float valve in the condensate return tank and automatically adds the correct amount of boiler compound to the return tank preventing the oxygen corrosion and scaling. Our SAHARA and DIB-M high purity separator water mister/evaporators provide a thrifty, legal method to get rid of the separator water generated by your dry-cleaning machine. See our Ad in this issue and for further information on EZtimers products visit www.eztimers.com Please address any questions or comments for Bruce to bruce@eztimers.com or call 702-376-6693.

