Dry cleaners have become famous for using the “Sorry, I couldn’t get it out” tag. In some cases, cleaners use this tag on virtually every stained item. They try and try but truly just can’t seem to get anything out. Successful stain removal is possible, but the proper procedures must be followed. Patience, knowledge of fabrics, dyes, stain removal agents, and the substances that cause stains will also be required. If a difficult stain is attacked incorrectly, failures will often result. This bulletin is the first in a series of stain removal bulletins that will focus on using the correct stain removal agent in the correct order.
FAT AND OIL STAINS
This procedure can be used to remove several stains such as:
- Corn oil
- Olive oil
- Sesame oil
- Peanut oil
- Lubricating oil
- Cod liver oil
- Food grease
- Coconut oil
- Linseed oil
- Sun tanning oil
- Butter
- Baby oil
- Bacon grease
- Vaseline
Identification
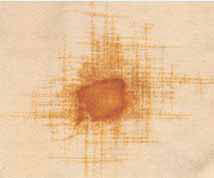
Oil stains may appear on a fabric in any shape or size. In some cases, the oil tends to follow the line of least resistance and spreads further along the yarns with a lower twist, causing a stain that is longer in one direction than the other. In a few cases, when the yarns in both directions are of equal twist, the stain will appear in the form of a cross. Oil stains usually do not change the color of the fabric in the stained area, but merely deepen it or darken the color.
Different types of oil affect fabrics differently. Vegetable oils such as corn, olive, sesame, and peanut oxidize rapidly, change color, and become very difficult to remove. As oils age or are exposed to heat or light, they oxidize and change color ranging from amber to light tan or brown. The intensity of the color of the oil stain is determined by the degree of oxidation. When oxidation is complete, oil stains are extremely difficult to remove.
Removal of Oil and Grease Stains
For proper removal, have the following on hand:
Dry-side Agents
- Volatile Dry Solvent
- Oily-Type Paint Remover
Keep in mind that this procedure may not be safe on some fabrics such as pigment prints; therefore, it is important to test for colorfastness before proceeding.
Procedure
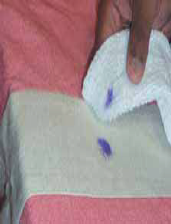
- Place a towel under the stained area (between fabric and spotting board).
- Apply volatile dry solvent.
- Remove the towel and tamp with a brush.
- Flush the area with volatile dry solvent. Flushing the stain is necessary to remove released staining material.
- If the stain remains, place towel under stained area and apply volatile dry solvent and oily-type paint remover (only enough to cover the stain).
- Remove towel and tamp with brush.
- Place towel under the stained area. Flush the oily-type paint remover with volatile dry solvent.
- If the stain remains, repeat steps 5 through 7 as often as it is apparent that some results are being obtained and no damage is being caused.
- After the stained area is clear flush thoroughly, remove the towel, and dry the area completely with the air gun.
Some oils do not respond well to the preceding treatment after they have oxidized. There is no way to determine in advance whether the stain will be easy or difficult to remove.

Oxidized oil stains may be treated with an alcoholic KOH solution. See Technical Operating Information No. 668 for more information on using the KOH solution.
PLASTIC-BASED STAINS
Plastic-based stains are nail polishes, lacquers, and some glues or adhesives. These materials are similar in composition. They dry or harden by the evaporation of the solvent contained within them. They also often contain a pigment or dye to give them color. The method of stain removal is basically the same. To remove these stains, it is only necessary to again make them soluble by the addition of the proper solvent.
Identification
Some examples of plastic stains are:
- Nail polish
- Lacquer
- Adhesives
- Household cement
- Paint
- White Out
NAIL POLISH stains are stiff, built up, colored, frequently shiny, and may or may not penetrate the fabric. LACQUERS are available in a number of colors. Like nail polish, a lacquer stain stiffens the area. It may or may not penetrate the fabric but usually builds up on the surface. Frequently, the stain is shiny in appearance. PLASTIC ADHESIVES are usually colorless but may come in various colors. Like nail polish and lacquer, the adhesive is stiff in the stained area. It may or may not penetrate the fabric but usually builds up on the surface. Frequently, the stain appears shiny.
Removal of Plastic Stains
For proper removal, have the following on hand:
Dry-side Agents
- Volatile Dry Solvent
- Oily-Type Paint Remover
- Amyl Acetate
- Acetone (Test for fiber content before using. Acetone will dissolve acetate.)
Procedure
To keep from having to force the staining material through the fabric built-up plastic stains should be worked from the reverse side of the fabric. Oily-type paint remover is used to hold the dye or pigment in suspension. This prevents it from being redeposited on the fabric, and can be readily flushed from the fabric.
Caution: Mechanical action might slow the removal of plastic stains by breaking down the suspension action of the oily-type paint remover and forcing the dye or pigment into the fibers and yarns.

Work from the reverse side of the fabric on these stains whenever possible.
- Place a towel under the stained area.
- Apply volatile dry solvent.
- Apply a small amount of oily-type paint remover.
- Apply amyl acetate.
- Continue applying amyl acetate a few drops at a time.
- If bleeding or softening of the stain is noted, blot with a towel.
- Continue to apply amyl acetate and blot any remaining stain.
- When bleeding stops, apply acetone after testing for fiber content.
- When the stain starts to spread on the fabric, flush with volatile dry solvent.
- After flushing, apply oily-type paint remover.
- Continue the application of amyl acetate or acetone a few drops at a time.
- Repeat steps 9, 10, and 11 as often as necessary.
- When the stain area is clear, flush thoroughly, remove the towel, and dry.
This article is from DLI TOI-700.

